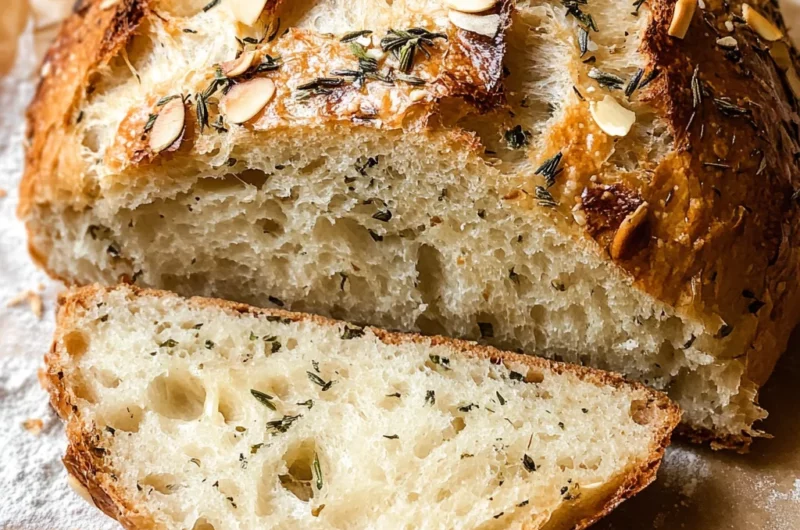
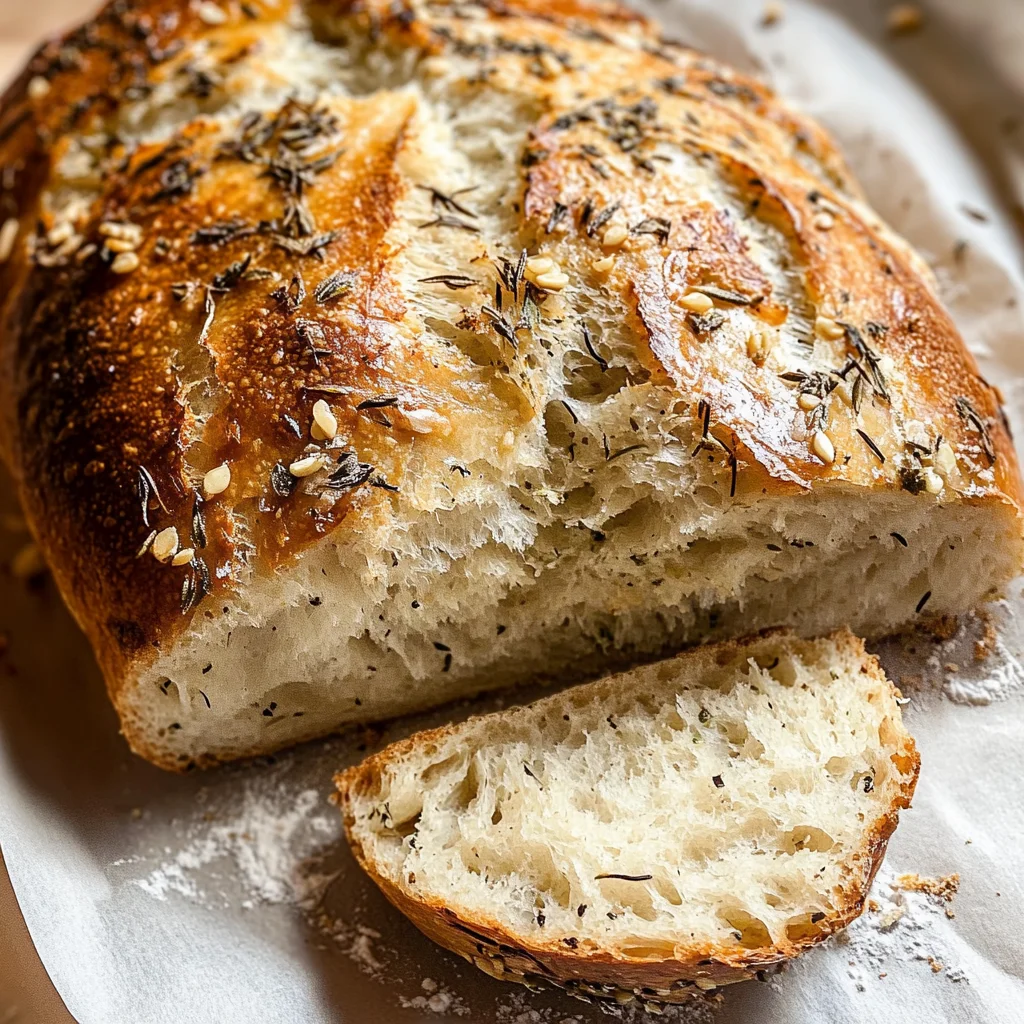
Garlic Herb Dutch Oven Bread Recipe You’ll Love Today! This delightful garlic herb bread is not only easy to make but also brings a warm, comforting aroma to your kitchen. Perfect for family dinners, gatherings, or simply enjoying with a meal, this bread stands out with its crispy crust and soft interior. You will love how simple ingredients transform into an irresistible loaf that pairs well with soups, salads, or as a delightful snack on its own.
Why You’ll Love This Recipe
- Simple Process: This recipe requires minimal effort and just a few ingredients.
- Delicious Flavor: The combination of garlic and fresh herbs creates a rich taste.
- Versatile Use: Enjoy it alongside any meal or as a tasty snack.
- Impressive Presentation: The golden-brown crust makes it look gourmet.
- Perfect for Sharing: Bake it for friends and family; it’s sure to delight everyone!
Tools and Preparation
Before diving into the baking process, gather your tools. Having the right equipment ensures smooth preparation and cooking.
Essential Tools and Equipment
- Large mixing bowl
- Dutch oven
- Plastic wrap
- Measuring cups and spoons
- Wooden spoon or spatula
- Wire rack
Importance of Each Tool
- Dutch oven: It provides even heat distribution, creating a perfect bread crust.
- Large mixing bowl: Helps combine all ingredients easily without mess.
- Plastic wrap: Keeps the dough moist during the resting period.
Ingredients
A delicious and easy-to-make garlic herb bread baked in a Dutch oven, perfect for any meal.
For the Dough
- 3 cups all-purpose flour
- 1 1/2 teaspoons salt
- 1/2 teaspoon instant yeast
- 1 1/2 cups warm water
Flavor Additions
- 4 cloves garlic, minced
- 2 tablespoons fresh herbs (such as rosemary and thyme), chopped
- 1 tablespoon olive oil
How to Make Garlic Herb Dutch Oven Bread Recipe You’ll Love Today!
Step 1: Mix Dry Ingredients
In a large bowl, mix together the flour, salt, and instant yeast until evenly combined.
Step 2: Add Wet Ingredients
Add the warm water, minced garlic, and chopped herbs to the dry ingredients. Stir until everything is well combined.
Step 3: Let It Rise
Cover the bowl with plastic wrap. Let it rest at room temperature for 12-18 hours. This allows the flavors to meld.
Step 4: Preheat Your Oven
After resting, preheat your oven to 450F (230C). Place your Dutch oven inside to heat up while you prepare the dough.
Step 5: Prepare the Dutch Oven
Carefully remove the hot Dutch oven from the oven. Add olive oil to coat the bottom.
Step 6: Shape the Dough
Transfer the rested dough onto a floured surface. Shape it gently into a ball without deflating it too much.
Step 7: Bake Covered
Place the dough into the hot Dutch oven. Cover it with a lid and bake for 30 minutes.
Step 8: Bake Uncovered
Remove the lid from your Dutch oven. Bake for an additional 15-20 minutes until the bread is golden brown on top.
Step 9: Cool Before Slicing
Once baked, let your bread cool on a wire rack before slicing into it. Enjoy your homemade garlic herb bread!
How to Serve Garlic Herb Dutch Oven Bread Recipe You’ll Love Today!
Garlic herb Dutch oven bread is not only delicious but also versatile. You can serve it in various ways to enhance your meals. Here are some creative ideas to enjoy this tasty bread.
Pair with Soups and Stews
- Creamy Tomato Soup – The bread complements the rich flavors of tomato soup perfectly.
- Hearty Beef Stew – Use the bread to soak up the savory broth and tender meat from the stew.
Serve with Dips
- Herbed Olive Oil Dip – Combine olive oil with balsamic vinegar and fresh herbs for a flavorful dip.
- Roasted Red Pepper Hummus – The garlic notes in the bread pair well with this creamy dip.
Enjoy as a Sandwich
- Caprese Sandwich – Layer fresh mozzarella, tomatoes, and basil for a refreshing treat.
- Turkey Avocado Sandwich – Create a hearty sandwich with turkey slices, avocado, and a spread of your choice.
Breakfast or Brunch Option
- Toast with Avocado – Top slices of bread with smashed avocado, salt, and pepper for a nutritious breakfast.
- Eggs Benedict Twist – Use the bread as a base for a unique take on eggs benedict.
How to Perfect Garlic Herb Dutch Oven Bread Recipe You’ll Love Today!
To achieve the best results with your garlic herb Dutch oven bread, follow these tips for perfection.
- Use Fresh Ingredients – Fresh garlic and herbs will enhance the flavor significantly.
- Let Dough Rest Properly – Allowing the dough to rest for 12-18 hours develops better flavor and texture.
- Preheat Your Dutch Oven – A hot Dutch oven creates that perfect crust while baking.
- Flour Your Surface Generously – This prevents sticking when shaping the dough into a ball.
- Cool Before Slicing – Letting the bread cool allows steam to escape, resulting in better texture.
Best Side Dishes for Garlic Herb Dutch Oven Bread Recipe You’ll Love Today!
Garlic herb Dutch oven bread pairs wonderfully with many side dishes. Here are some top choices that complement its flavors nicely.
- Caesar Salad – Crisp romaine lettuce topped with Parmesan cheese and Caesar dressing provides a refreshing contrast.
- Grilled Vegetables – Seasonal veggies grilled to perfection add color and nutrition to your meal.
- Macaroni and Cheese – Creamy mac and cheese offers a comforting side that pairs well with the bread’s texture.
- Stuffed Mushrooms – Savory stuffed mushrooms make for an excellent appetizer or side dish.
- Coleslaw – A crunchy coleslaw adds brightness and balances out richer flavors from main dishes.
- Brussels Sprouts with Bacon – The smoky flavor of bacon enhances roasted Brussels sprouts, making them irresistible alongside the bread.
Common Mistakes to Avoid
Making garlic herb Dutch oven bread can be a delightful experience, but it’s important to avoid common mistakes for the best results.
- Using cold water: Starting with cold water can hinder yeast activation. Always ensure your water is warm to help the dough rise properly.
- Skipping rest time: Not allowing enough resting time can result in dense bread. Aim for at least 12 hours for optimal flavor and texture.
- Neglecting preheating: Failing to preheat your Dutch oven can affect the crust. Always preheat it to the specified temperature before adding the dough.
- Not using enough flour: Using too little flour can make the dough sticky and hard to work with. Ensure you have enough flour on hand when shaping your bread.
- Cutting too soon: Slicing into the bread while its still hot can cause it to become gummy. Let it cool on a wire rack before cutting.
Storage & Reheating Instructions
Refrigerator Storage
- Store any leftover bread in an airtight container.
- The garlic herb Dutch oven bread will stay fresh for up to 3 days in the refrigerator.
Freezing Garlic Herb Dutch Oven Bread Recipe You’ll Love Today!
- Wrap the cooled loaf tightly in plastic wrap or aluminum foil.
- The bread can be frozen for up to 3 months. Label with the date for reference.
Reheating Garlic Herb Dutch Oven Bread Recipe You’ll Love Today!
- Oven: Preheat your oven to 350F (175C) and heat the bread wrapped in foil for about 10-15 minutes.
- Microwave: Use a microwave-safe plate, cover with a damp paper towel, and heat for 10-15 seconds at a time until warm.
- Stovetop: Heat in a skillet over low heat, turning occasionally until warmed through.
Frequently Asked Questions
Here are some common questions about making garlic herb Dutch oven bread that you might find helpful.
Can I add other herbs to the Garlic Herb Dutch Oven Bread Recipe You’ll Love Today!?
Yes, feel free to experiment with herbs like basil or oregano for different flavors.
What should I do if my dough doesnt rise?
Ensure that your yeast is fresh and that you used warm water. If it still doesnt rise, you may need to start over.
How do I know when my garlic herb bread is done baking?
The bread should be golden brown on top and sound hollow when tapped on the bottom.
Can I make this bread gluten-free?
Absolutely! Substitute all-purpose flour with a gluten-free flour blend designed for baking.
Final Thoughts
This garlic herb Dutch oven bread recipe you’ll love today! is not only simple but also incredibly versatile. You can customize it by adding cheese or different herbs based on your preference. Give this easy recipe a try, and enjoy freshly baked bread that elevates any meal!
Garlic Herb Dutch Oven Bread

Discover the joy of baking with this Garlic Herb Dutch Oven Bread Recipe You’ll Love Today! This easy-to-make bread fills your kitchen with a warm, inviting aroma and features a delightful blend of garlic and fresh herbs. With a crispy crust and soft interior, its perfect for family dinners, gatherings, or simply enjoyed on its own. Just a few simple ingredients transform into an irresistible loaf that pairs beautifully with soups, salads, or as a savory snack. Impress your friends and family with this gourmet-style bread that looks as good as it tastes!
- Prep Time: 15 minutes
- Cook Time: 45 minutes
- Total Time: 1 hour
- Yield: About 12 servings 1x
- Category: Bread
- Method: Baking
- Cuisine: American
Ingredients
- 3 cups all-purpose flour
- 1 teaspoons salt
- teaspoon instant yeast
- 1 cups warm water
- 4 cloves garlic, minced
- 2 tablespoons fresh herbs (rosemary and thyme), chopped
- 1 tablespoon olive oil
Instructions
- In a large mixing bowl, combine flour, salt, and instant yeast.
- Mix in warm water, minced garlic, and chopped herbs until well combined.
- Cover the bowl with plastic wrap and let it rest at room temperature for 12-18 hours.
- Preheat your oven to 450F (230C) with the Dutch oven inside.
- Carefully remove the hot Dutch oven and coat the bottom with olive oil.
- Transfer the rested dough onto a floured surface and shape it gently into a ball.
- Place the dough in the hot Dutch oven, cover it, and bake for 30 minutes.
- Remove the lid and bake for an additional 15-20 minutes until golden brown.
- Let cool on a wire rack before slicing.
Nutrition
- Serving Size: 1 slice (50g)
- Calories: 130
- Sugar: 0g
- Sodium: 180mg
- Fat: 1g
- Saturated Fat: 0g
- Unsaturated Fat: 0g
- Trans Fat: 0g
- Carbohydrates: 25g
- Fiber: 1g
- Protein: 4g
- Cholesterol: 0mg