

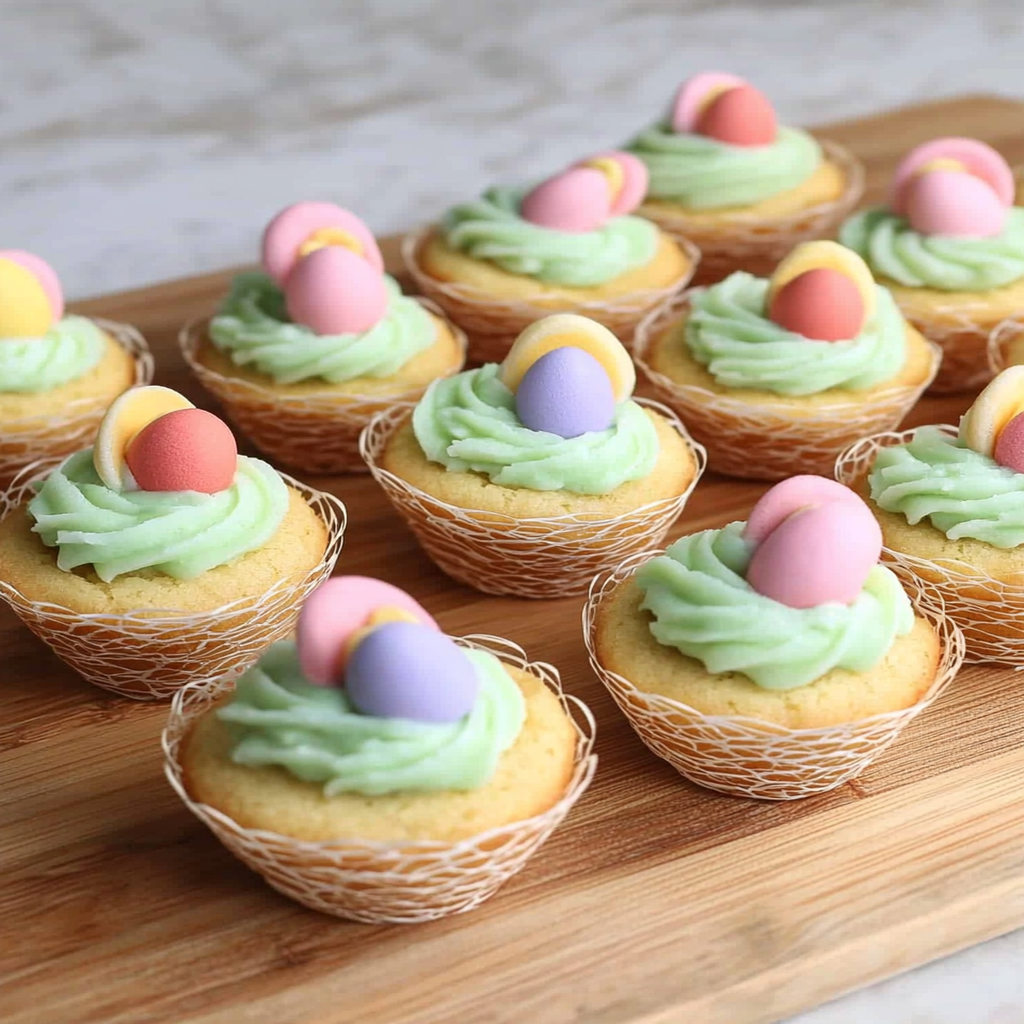
Easter is just around the corner, and what better way to celebrate than with delightful Easter Basket Cookie Cups? These charming treats not only capture the spirit of the season but also bring joy to both kids and adults alike. Imagine a buttery cookie cup filled with creamy frosting and topped with colorful candies that resemble an Easter basket brimming with goodies. This recipe is not only fun to make but also provides a canvas for creativity; you can customize your toppings based on your favorite candies or even seasonal themes! Furthermore, these cookie cups are simple enough for little hands to help in the kitchen, making them an excellent choice for family bonding time. If youre looking to impress at your next holiday gathering or simply want to indulge in a sweet treat at home, these cookie cups are sure to steal the show. Follow along as we guide you through making these delicious delights from scratch!
Why You’ll Love This Easter Basket Cookie Cups
- Quick and Easy: Minimal prep time and straightforward steps make this recipe stress-free, even for novice cooks
- Customizable Treats: Use your favorite candies or toppings to create unique flavors that everyone will love
- Fun for Everyone: Kids will enjoy helping out in the kitchen while decorating their own cookie cups

Ingredients for Easter Basket Cookie Cups
Here’s what you’ll need to make this delicious dish:
- All-Purpose Flour: Essential for creating the structure of your cookie cups; ensure it’s measured accurately for the best results
- Granulated Sugar: Provides sweetness and helps achieve a nice texture; avoid using too much as it can affect baking
- Butter: Use unsalted butter at room temperature to enhance flavor and ensure easy mixing
- Eggs: Two large eggs add moisture and act as binders in the cookie mixture
- Baking Powder: A leavening agent that helps your cookie cups rise properly during baking
- Vanilla Extract: Adds depth of flavor; opt for pure vanilla extract if possible for the best taste
For the Frosting:
- Powdered Sugar: The base for your frosting; sift it before use to avoid lumps in your final product
- Butter (for frosting): Use softened unsalted butter to create a smooth, creamy frosting consistency
- Milk: Add milk gradually until you reach the desired frosting consistency
For Toppings:
- Candy Eggs or Sprinkles: Choose vibrant candy eggs or colorful sprinkles to resemble an Easter basket look
The full ingredients list, including measurements, is provided in the recipe card directly below.
How to Make Easter Basket Cookie Cups
Follow these simple steps to prepare this delicious dish:
Step 1: Preheat Your Oven
Preheat your oven to 350F (175C). Prepare a muffin tin by greasing it lightly with nonstick cooking spray.
Step 2: Mix Dry Ingredients
In a medium bowl, whisk together all-purpose flour and baking powder. Set aside while you prepare the wet ingredients.
Step 3: Cream Butter and Sugar
In a large mixing bowl, beat together softened butter and granulated sugar until light and fluffy. This should take about two minutes on medium speed.
Step 4: Add Eggs and Vanilla
Add eggs one at a time into the butter-sugar mixture. Mix well after each addition before adding vanilla extract.
Step 5: Combine Mixtures
Gradually add your dry ingredients into the wet mixture. Stir until just combined; do not overmix.
Step 6: Bake the Cookie Cups
Scoop about one tablespoon of dough into each muffin tin cavity. Press down gently to create a cup shape. Bake for about 10-12 minutes or until golden brown around the edges.
Transfer to plates and fill each cup with frosting before decorating with candy eggs or sprinkles for that festive touch!

Tips and Tricks
Here are some helpful tips to ensure the best results for your dish:
- Room Temperature Ingredients: Ensure all ingredients are at room temperature before starting; this helps them combine more easily
- Bake Evenly: Rotate your muffin tin halfway through baking to promote even cooking
- Storage Tips: Store any leftover cookie cups in an airtight container at room temperature for up to three days
- Candy Choices: Feel free to mix different types of candy toppings based on personal preferences or seasonal availability
How to Serve Easter Basket Cookie Cups
This Easter Basket Cookie Cups is versatile and pairs wonderfully with:
- Vanilla Ice Cream: The creaminess of vanilla ice cream enhances the sweet flavors of the cookie cups, creating a delightful dessert experience.
- Fresh Berries: Juicy berries add a burst of freshness that balances the sweetness, making each bite more enjoyable.
- Chocolate Sauce: Drizzling warm chocolate sauce on top intensifies the indulgence of the cookie cups, perfect for chocolate lovers.
Feel free to pair it with your favorite sides for a personalized meal!
Make Ahead and Storage
- Make Ahead: You can prepare the cookie dough up to two days in advance. Store it in an airtight container in the refrigerator. Bake the cookie cups fresh when ready to serve for the best texture and flavor.
- Storing: Store any leftover Easter Basket Cookie Cups in an airtight container at room temperature for up to three days. For longer storage, refrigerate them for up to a week.
- Reheating: To reheat, place cookie cups in a preheated oven at 350F (175C) for about 5-7 minutes. This method helps maintain their softness and flavor without compromising texture.
Suggestions for Easter Basket Cookie Cups
Use Room Temperature Ingredients
One common mistake when making Easter Basket Cookie Cups is using cold ingredients straight from the fridge. For the best texture and flavor, ensure your butter and eggs are at room temperature before mixing. Room temperature butter creams better and incorporates air, leading to lighter cookie cups. Cold eggs can cause the dough to stiffen, making it difficult to mix. To bring ingredients to room temperature quickly, leave them out on the counter for about 30 minutes before starting your recipe. This small step can significantly improve the outcome of your Easter Basket Cookie Cups.
Overmixing the Dough
When preparing your dough for Easter Basket Cookie Cups, avoid overmixing at all costs. Overmixing can lead to tough cookies due to the development of gluten in the flour. Mix just until the ingredients are combined; lumps in your dough are okay. This approach ensures that your cookie cups turn out tender and chewy rather than hard and dry. Remember, you want a soft and pliable dough that bakes beautifully into delightful cups that hold your favorite fillings.
Not Using a Non-Stick Pan
Using the wrong type of pan can ruin your Easter Basket Cookie Cups from the start. A non-stick or silicone baking pan is essential for easy removal of your cookie cups once baked. If you use a regular metal pan without greasing it properly, you could end up with broken cookie cups stuck to the pan. Always grease your baking dish lightly or opt for parchment paper for added protection against sticking. This simple tip will save you time and frustration when serving these adorable treats.
Skipping Cooling Time
After baking your Easter Basket Cookie Cups, dont rush them off the tray immediately! Allow them to cool in the pan for a few minutes before transferring them to a wire rack. This cooling time helps set their shape and makes them easier to handle without breaking apart. If you skip this step, you risk losing some of your precious cookie cups during transfer, which can be disheartening after all that hard work. Patience is key here; let them cool properly for perfect results.
FAQs
What Are Easter Basket Cookie Cups?
Easter Basket Cookie Cups are delightful treats made from cookie dough shaped into small cups and filled with various candies or sweets, mimicking an Easter basket’s look. These cookie cups often feature colorful decorations such as mini chocolate eggs or jellybeans on top, making them visually appealing and festive for the holiday season. They offer a fun twist on traditional cookies while allowing creativity in fillings and toppings; thus, they are perfect for family gatherings or Easter celebrations.
How Do I Store Leftover Easter Basket Cookie Cups?
To store leftover Easter Basket Cookie Cups properly, place them in an airtight container at room temperature for up to three days. If you want to keep them fresh longer, consider refrigerating them; however, be aware that refrigeration may affect their texture slightly. When ready to enjoy again, allow them to come back to room temperature before serving so they regain their softness. For longer storage options, these cookie cups freeze well; just ensure theyre in a freezer-safe container separated by parchment paper.
Can I Customize Fillings for Easter Basket Cookie Cups?
Absolutely! One of the best aspects of making Easter Basket Cookie Cups is how easily you can customize their fillings according to personal preferences or dietary needs. You can fill these cookie cups with chocolate ganache, cream cheese frosting, or even fruit preserves for a fruity twist. Additionally, consider using different types of candy like marshmallows or gummy candies that celebrate springtime themes or colors associated with Easter festivities.
Is It Possible to Make Gluten-Free Easter Basket Cookie Cups?
Yes! You can easily adapt the recipe for Easter Basket Cookie Cups into a gluten-free version by substituting regular flour with gluten-free all-purpose flour blends available in stores today. Look for blends specifically designed for baking as they often include xanthan gum or other binding agents essential for maintaining structure in baked goods. With this substitution and careful attention during mixing and baking times, you’ll achieve delicious gluten-free cookie cups suitable for everyone at your gathering.
Conclusion for Easter Basket Cookie Cups
Creating delightful Easter Basket Cookie Cups is a fun way to celebrate this festive occasion with family and friends. By avoiding common mistakes such as using cold ingredients or overmixing dough, you’ll ensure each cup bakes perfectly with a tender texture ideal for holding various sweet fillings. Remember also not to skip cooling time after baking; this crucial step preserves their shape and prevents breakage during transfer. With endless possibilities in terms of customizationranging from different fillings to variations in toppingsyou can make these treats uniquely yours while delighting everyone at your Easter celebration! Enjoy crafting these charming cookies that capture the spirit of springtime while satisfying sweet cravings!
Easter Basket Cookie Cups

Easter Basket Cookie Cups are a delightful and festive treat that brings joy to your holiday celebrations. This easy-to-make recipe combines buttery cookie cups with creamy frosting, topped with colorful candy that resembles an Easter basket filled with goodies. Perfect for family bonding, these cookie cups invite creativity in the kitchen, allowing kids and adults to customize their treats with their favorite candies. With minimal prep time and straightforward steps, you can whip up these charming desserts in no time. Whether you’re hosting a gathering or simply enjoying a sweet snack at home, these Easter Basket Cookie Cups are sure to impress everyone!
- Prep Time: 15 minutes
- Cook Time: 12 minutes
- Total Time: 27 minutes
- Yield: Approximately 12 servings 1x
- Category: Dessert
- Method: Baking
- Cuisine: American
Ingredients
- 2 cups all-purpose flour
- 1 cup granulated sugar
- cup unsalted butter, softened
- 2 large eggs
- 1 tsp baking powder
- 1 tsp vanilla extract
- For frosting: 2 cups powdered sugar, cup unsalted butter (softened), milk as needed
- For toppings: Candy eggs or colorful sprinkles
Instructions
- Preheat oven to 350F (175C) and lightly grease a muffin tin.
- In a bowl, whisk together flour and baking powder; set aside.
- In a large bowl, cream together butter and sugar until fluffy.
- Add eggs one at a time, mixing well after each addition along with vanilla extract.
- Gradually incorporate dry ingredients into wet mixture until just combined.
- Scoop about one tablespoon of dough into each muffin tin cavity; press down gently.
- Bake for 10-12 minutes or until edges are golden brown.
- Allow cooling slightly, then fill with frosting and decorate with candy.
Nutrition
- Serving Size: 1 cookie cup (40g)
- Calories: 130
- Sugar: 10g
- Sodium: 45mg
- Fat: 6g
- Saturated Fat: 3g
- Unsaturated Fat: 2g
- Trans Fat: 0g
- Carbohydrates: 18g
- Fiber: <1g
- Protein: 2g
- Cholesterol: 30mg


