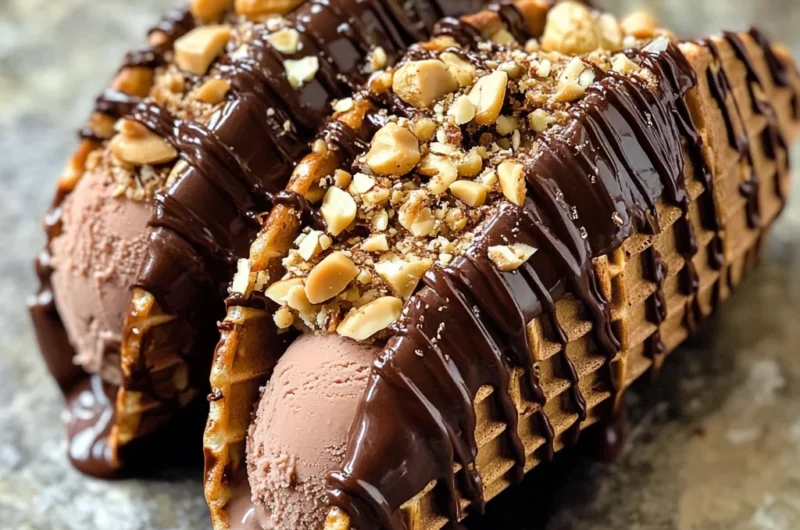
It’s easy to make these Homemade Choco Tacos—a delightful combination of a homemade chocolate waffle cone, creamy ice cream, and a crunchy chocolate-peanut coating. This recipe is perfect for summer gatherings, birthday parties, or just a fun treat at home. With its irresistible flavor and customizable options, everyone will enjoy their own unique taco creation.
Why You’ll Love This Recipe
- Delicious Flavor: The rich chocolate waffle cone pairs perfectly with any flavor of ice cream.
- Customizable: You can choose your favorite ice cream and toppings, making each taco unique.
- Fun Presentation: These choco tacos are not only tasty but also look fantastic on any dessert table.
- Easy to Make: Despite the impressive outcome, this recipe is straightforward and requires minimal effort.
- Perfect for Gatherings: Serve them at parties or family get-togethers for a treat that everyone will love.
Tools and Preparation
Before diving into the delicious world of homemade choco tacos, ensure you have the right tools ready. These items will help you create the perfect taco shape and texture.
Essential Tools and Equipment
- Waffle cone maker
- Mixing bowl
- Whisk
- Spatula
- Freezer-safe tray
Importance of Each Tool
- Waffle cone maker: This tool is essential for creating the perfect taco shell. It ensures even cooking and gives you that classic waffle texture.
- Mixing bowl: A sturdy mixing bowl allows you to easily combine all your ingredients until smooth without any spills.
- Whisk: Using a whisk helps incorporate air into the batter, making your cones light and crispy.
Ingredients
For the Chocolate Waffle Cone
- 1 C granulated sugar
- 4 lrg egg whites
- 1 tsp vanilla
- 1/4 tsp salt
- 4 Tbsp butter melted
- 6 Tbsp unsweetened cocoa powder
- 11 Tbsp all-purpose flour
For the Filling and Coating
- 1 gallon Ice cream – any flavor (softened)
- 16 oz Chocolate wafers
- 1 1/2 C Chopped peanuts
How to Make Homemade Choco Taco Tutorial
Step 1: Prepare the Waffle Batter
Mix all the chocolate waffle ingredients together in a mixing bowl until smooth. Ensure there are no lumps in your batter for the best texture.
Step 2: Cook the Waffle Cones
In your waffle cone maker, pipe a log of batter into the machine (about 2-3 Tbsp). Cook for about 40-45 seconds on medium heat. Once done, carefully hang on a rack so it cools in a taco shell shape.
Step 3: Soften the Ice Cream
While your waffle cones cool, soften your chosen ice cream by letting it sit at room temperature. Stir well to achieve a consistent texture—no half runny and half hard!
Step 4: Fill Your Taco Shells
Take one cooled shell at a time and scoop the softened ice cream into it. Place each filled taco back in the freezer while you work on more tacos. Remember to handle only 2-3 tacos at once to prevent melting.
Step 5: Dip in Chocolate
Melt the chocolate wafers according to package instructions and let cool slightly. Dip the open ice cream side of each taco into the melted chocolate, covering all exposed ice cream areas.
Step 6: Add Peanuts
Immediately dip each chocolate-coated side into chopped peanuts for that extra crunch.
Step 7: Freeze Until Ready to Serve
Keep your completed homemade choco tacos frozen until you’re ready to serve them. Enjoy this sweet summer treat!
How to Serve Homemade Choco Taco Tutorial
Homemade Choco Tacos make a delightful summer treat that brings joy to any gathering. Here are some creative serving suggestions to elevate your dessert experience.
For a Classic Treat
- Ice Cream Pairing: Serve with additional scoops of your favorite ice cream on the side for a double dessert delight.
- Chocolate Sauce Drizzle: Add a drizzle of warm chocolate sauce over the top for an extra touch of indulgence.
Perfect for Parties
- Dessert Bar Setup: Create a DIY dessert bar where guests can customize their toppings, such as sprinkles or whipped cream.
- Mini Taco Platter: Make smaller versions of the tacos for bite-sized treats that are perfect for parties.
Enjoy with Beverages
- Milkshakes: Pair these tacos with chocolate or vanilla milkshakes for a fun and creamy combination.
- Coffee or Tea: Serve alongside a cup of coffee or tea to balance the sweetness with some warmth.
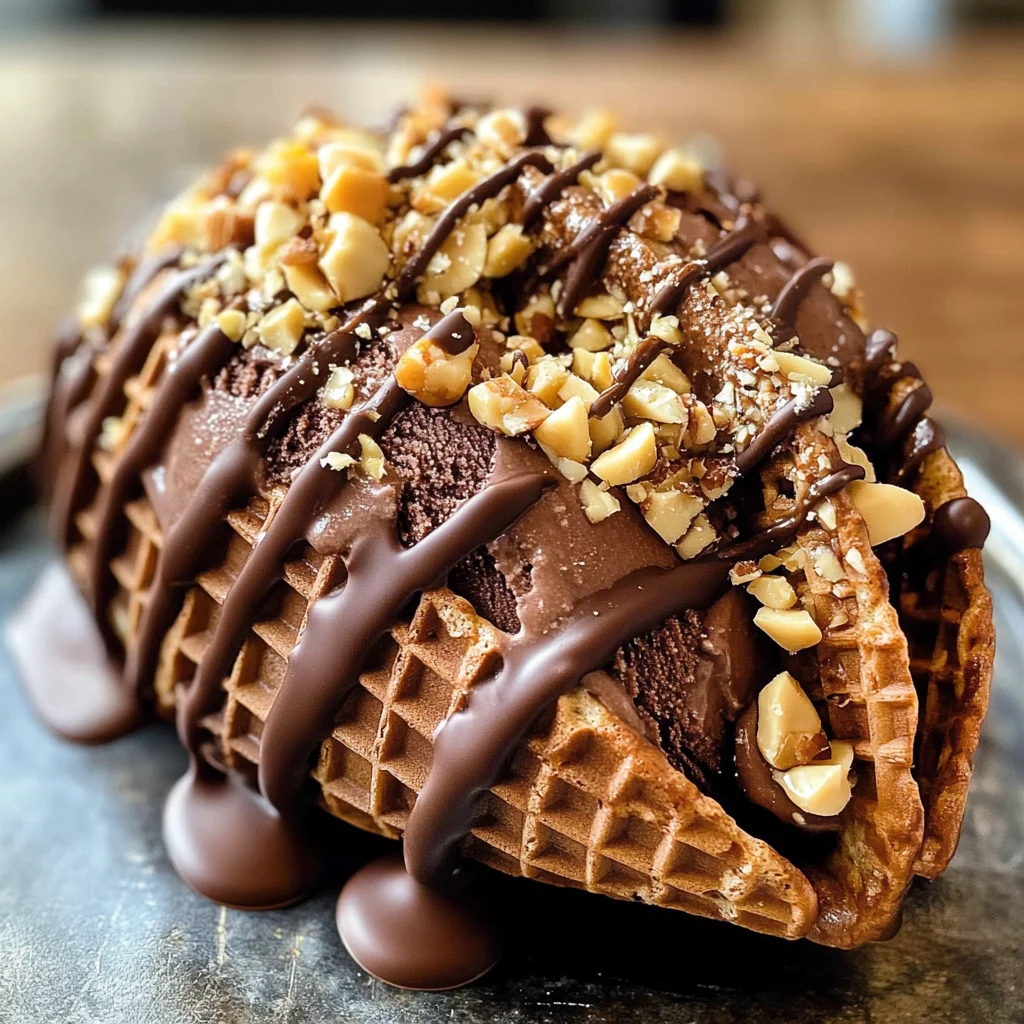
How to Perfect Homemade Choco Taco Tutorial
To make your Homemade Choco Tacos truly shine, consider these helpful tips.
- Bold Preparation: Ensure all ingredients are at room temperature before mixing. This helps create a smoother batter.
- Bold Waffle Cone Technique: Pipe the batter evenly in the waffle cone maker to achieve uniform taco shells.
- Bold Ice Cream Consistency: Softening the ice cream is key. Stir thoroughly until it’s creamy but not melted.
- Bold Topping Timing: Dip the tacos in chocolate and peanuts immediately after filling them with ice cream; this prevents melting and sogginess.
- Bold Freezing Tip: Keep the assembled tacos in the freezer until ready to serve. This ensures they maintain their shape and flavor.
- Bold Experimenting with Flavors: Don’t hesitate to try different ice cream flavors or toppings like caramel or crushed cookies for unique twists.
Best Side Dishes for Homemade Choco Taco Tutorial
Pair your Homemade Choco Tacos with these delicious side dishes to complement your dessert spread.
- Fresh Fruit Salad: A light and refreshing option that balances out the richness of the tacos.
- Cheesecake Bites: Mini cheesecake squares add a creamy contrast that pairs well with chocolate flavors.
- Chocolate-Covered Strawberries: These sweet treats enhance the chocolate theme while adding a fruity element.
- Brownies: Rich brownies create a decadent dessert duo when served alongside choco tacos.
- Pineapple Sorbet: This fruity sorbet offers a cooling effect that refreshes the palate after indulging in sweets.
- Nutty Granola Bars: Crunchy granola bars provide texture and nutty flavor, making them a great snack alongside choco tacos.
Common Mistakes to Avoid
Making Homemade Choco Tacos can be a fun experience, but there are some common pitfalls to watch out for.
- Ignoring the batter consistency: If your batter is too runny or thick, the waffles won’t cook properly. Aim for a smooth, pourable consistency.
- Overfilling the waffle cone maker: Adding too much batter can lead to messy overflow. Use only 2-3 tablespoons of batter per taco.
- Not cooling the taco shells: Failing to let the taco shells cool in shape will result in breakage. Hang them on a rack until they are completely cool.
- Skipping ice cream softening: Trying to scoop hard ice cream can ruin your tacos. Always soften the ice cream until it’s easy to scoop before filling.
- Rushing the dipping process: Don’t let the ice cream melt while dipping in chocolate and peanuts. Work with a few at a time to keep everything firm.
Storage & Reheating Instructions
Refrigerator Storage
- Store any leftover homemade choco tacos in an airtight container.
- They can last up to 2 days in the refrigerator but are best eaten fresh.
Freezing Homemade Choco Taco Tutorial
- Place the tacos in a single layer on a baking sheet and freeze for 1-2 hours before transferring them to an airtight container.
- Properly stored, they can last up to 2 months in the freezer.
Reheating Homemade Choco Taco Tutorial
- Oven: Preheat your oven to 350°F (175°C). Place tacos on a baking sheet for about 5-10 minutes until slightly warmed.
- Microwave: Microwave on high for about 15-20 seconds. Be cautious not to overheat as it may melt the shell.
- Stovetop: Warm on low heat in a skillet for about 2-3 minutes, turning occasionally to prevent burning.
Frequently Asked Questions
Here are some frequently asked questions about making these delicious homemade choco tacos.
What flavor ice cream works best for Homemade Choco Taco Tutorial?
Any flavor of softened ice cream works great! Classic choices like vanilla, chocolate, or strawberry complement the chocolate waffle well.
Can I customize my Homemade Choco Taco Tutorial?
Absolutely! You can add toppings like sprinkles, crushed cookies, or different nuts instead of peanuts for variety.
How do I ensure my taco shells stay crispy?
Make sure they cool completely after cooking before adding ice cream and store them properly in an airtight container.
Can I use store-bought waffle cones instead?
While homemade offers better flavor and texture, you can substitute with store-bought waffle cones if you’re short on time.
Final Thoughts
The Homemade Choco Taco Tutorial is not just a delightful treat but also very adaptable. You can easily customize flavors and toppings according to your preferences. Whether you’re making them for a summer party or just a sweet snack, these tacos are sure to impress!
Homemade Choco Tacos
Indulge in the joy of summer with our Homemade Choco Tacos, a delightful treat featuring crispy chocolate waffle cones filled with your favorite ice cream and coated with a crunchy chocolate-peanut topping. This easy-to-follow recipe allows you to customize each taco according to your taste, making it perfect for parties, family gatherings, or just a fun dessert at home. With a beautiful presentation and irresistible flavors, these choco tacos are sure to be a hit with everyone!
- Prep Time: 15 minutes
- Cook Time: 10 minutes
- Total Time: 25 minutes
- Yield: Approximately 12 servings 1x
- Category: Dessert
- Method: Baking
- Cuisine: American
Ingredients
- 1 cup granulated sugar
- 4 large egg whites
- 1 teaspoon vanilla extract
- 1/4 teaspoon salt
- 4 tablespoons melted butter
- 6 tablespoons unsweetened cocoa powder
- 11 tablespoons all-purpose flour
- 1 gallon softened ice cream (any flavor)
- 16 ounces chocolate wafers
- 1.5 cups chopped peanuts
Instructions
- Prepare the waffle batter by mixing all ingredients until smooth.
- Cook the batter in a waffle cone maker for about 40-45 seconds until golden brown. Shape into taco shells as they cool.
- Soften the ice cream and scoop it into cooled taco shells.
- Dip the open side of each taco in melted chocolate wafers and then in chopped peanuts.
- Freeze until ready to serve.
Nutrition
- Serving Size: 1 taco (150g)
- Calories: 380
- Sugar: 36g
- Sodium: 180mg
- Fat: 22g
- Saturated Fat: 10g
- Unsaturated Fat: 9g
- Trans Fat: 0g
- Carbohydrates: 41g
- Fiber: 2g
- Protein: 6g
- Cholesterol: 30mg

